UIKit construct and manage a graphical, event-driven user interface for your iOS, iPadOS, or tvOS app.
Overview
UIKit provides a variety of features for building apps, including components you can use to construct the core infrastructure of your iOS, iPadOS, or tvOS apps.
The framework provides the window and view architecture for implementing your UI, the event-handling infrastructure for delivering Multi-Touch and other types of input to your app, and the main run loop for managing interactions between the user, the system, and your app.
Important
Use UIKit classes only from your app’s main thread or main dispatch queue, unless otherwise indicated in the documentation for those classes. This restriction particularly applies to classes that derive from UIResponder or that involve manipulating your app’s user interface in any way.
Essentials
About App Development with UIKit
The structure of UIKit apps is based on the Model-View-Controller (MVC) design pattern. Model objects manage the app’s data and business logic. View objects provide the visual representation of your data. Controller objects act as a bridge between your model and view objects, moving data between them at appropriate times.
You provide the model objects that represent your app’s data structures. UIKit provides most of the view objects, although you can define custom views for your data, as needed. Coordinating the exchange of data between your data objects and the UIKit views are your view controllers and app delegate object.
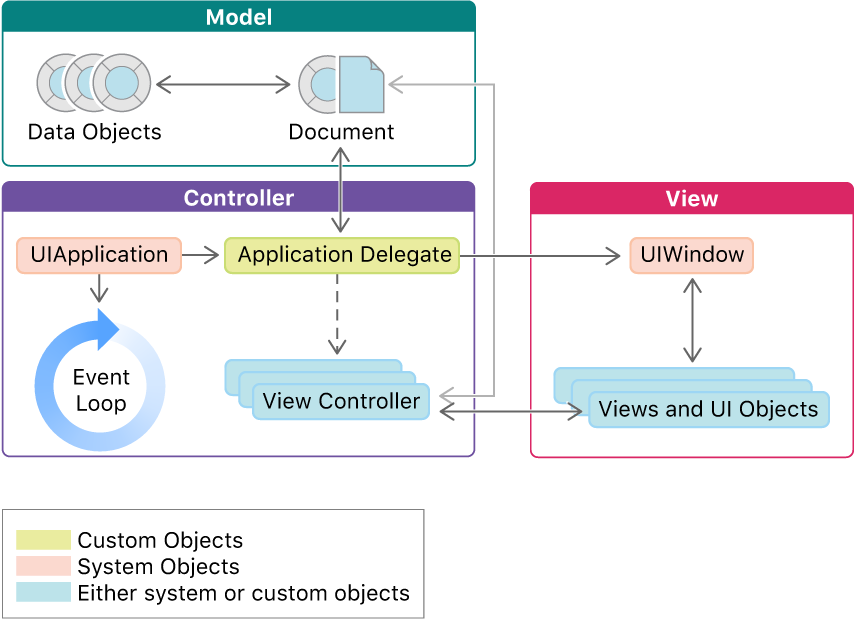
- UIKit defines the UIView class, which is usually responsible for displaying your content onscreen. (You can also render content directly to the screen using Metal and other system frameworks.)
- The UIApplication object runs your app’s main event loop and manages your app’s overall life cycle.
App structure
App and environment
In iOS 13 and later, a person can create and manage multiple instances of your app’s user interface simultaneously, and switch between them using the app switcher. For example, a person can display one instance of the Calendar app showing a specific day, and another showing an entire month.
UIKit communicates details about the current environment using trait collections, which reflect a combination of device settings, interface settings, and user preferences. For example, you use traits to detect whether Dark Mode is active for the current view or view controller. Consult the current trait collection of your UIView or UIViewController object when you want to customize its contents based on the current environment. Adopt the UITraitEnvironment protocol in other objects when you want them to receive trait notification changes.
Life cycle
Managing your app’s life cycle
When your app’s state changes, UIKit notifies you by calling methods of the appropriate delegate object:
- In iOS 13 and later, use UISceneDelegate objects to respond to life-cycle events in a scene-based app.
- In iOS 12 and earlier, use the UIApplicationDelegate object to respond to life-cycle events.
Respond to scene-based life-cycle events
If your app supports scenes, UIKit delivers separate life-cycle events for each. A scene represents one instance of your app’s UI running on a device. The user can create multiple scenes for each app, and show and hide them separately.
Important
Scene support is an opt-in feature. To enable basic support, add the UIApplicationSceneManifest key to your app’s Info.plist file as described in Specifying the scenes your app supports.
The following figure shows the state transitions for scenes. When the user or system requests a new scene for your app, UIKit creates it and puts it in the unattached state. User-requested scenes move quickly to the foreground, where they appear onscreen. A system-requested scene typically moves to the background so that it can process an event.

Use scene transitions to perform the following tasks:
- When UIKit connects a scene to your app: configure scene’s initial UI and load the data.
- When transitioning to the foreground-active state: configure UI and prepare to interact with the user.
- Upon leaving the foreground-active state: save data and quiet your app’s behavior.
- Upon entering the background state: finish crucial tasks, free up as much memory as possible, and prepare for your app snapshot.
- At scene disconnection, clean up any shared resources associated with the scene.
- In addition to scene-related events, you must also respond to the launch of your app using your UIApplicationDelegate object.
Respond to app-based life-cycle events
In iOS 12 and earlier, and in apps that don’t support scenes, UIKit delivers all life-cycle events to the UIApplicationDelegate object. The app delegate manages all of your app’s windows, including those displayed on separate screens. As a result, app state transitions affect your app’s entire UI, including content on external displays.
The following figure shows the state transitions involving the app delegate object. After launch, the system puts the app in the inactive or background state, depending on whether the UI is about to appear onscreen. When launching to the foreground, the system transitions the app to the active state automatically. After that, the state fluctuates between active and background until the app terminates.

Use app transitions to perform the following tasks:
- At launch, initialize your app’s data structures and UI.
~= connects - At activation, finish configuring your UI and prepare to interact with the user.
~= foreground-active - Upon deactivation, save data and quiet your app’s behavior.
~= leaving the foreground-active - Upon entering the background state, finish crucial tasks, free up as much memory as possible, and prepare for your app snapshot.
same - At termination, stop all work immediately and release any shared resources.
~= disconnection
[Behavioral events]: Responding to memory warnings
If the system runs low on free memory and is unable to reclaim memory by terminating suspended apps, UIKit sends a low-memory warning to running apps.
UIKit delivers low-memory warnings in the following ways:
- It calls the
applicationDidReceiveMemoryWarning(_:)method of your app delegate. - It calls the
didReceiveMemoryWarning()method of any active UIViewController classes. - It posts a
didReceiveMemoryWarningNotificationobject to any registered observers. - It delivers a warning to dispatch queues of type
DISPATCH_SOURCE_TYPE_MEMORYPRESSURE.
Important
Failure to reduce your app’s memory usage may result in your app’s termination. Therefore, consider writing any unsaved data to disk as part of your cleanup efforts.
To test your app’s response to a low-memory warning, use the Simulate Memory Warning command in iOS Simulator.
Responding to the launch of your app
All apps have an associated process, which the UIApplication object represents. Apps also have an app delegate object — an object that conforms to the UIApplicationDelegate protocol — which responds to important events happening within that process. Even a scene-based app uses an app delegate to manage fundamental events like launch and termination. At launch time, UIKit automatically creates the UIApplication object and your app delegate. It then starts your app’s main event loop.
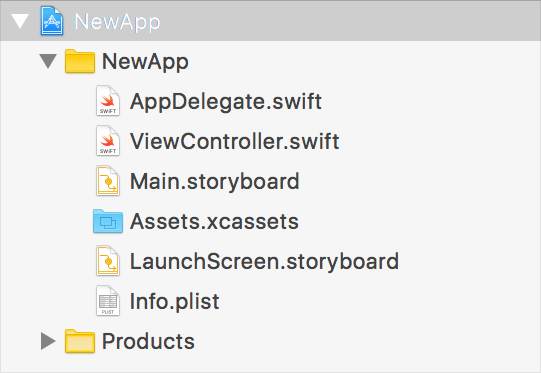
- Provide a launch storyboard: When the user first launches your app on a device, the system displays your launch storyboard until your app is ready to display its UI. Displaying the launch storyboard assures the user that your app launched and is doing something. If your app initializes itself and readies its UI quickly, the user may see your launch storyboard only briefly.
Important
Don’t use a static image for your launch screen. In iOS 14 and later, the launch screen is limited to 25 MB.
Initialize your app’s data structures: Put your app’s launch-time initialization code in one or both of the following methods: 1.
application(_:willFinishLaunchingWithOptions:)2.application(_:didFinishLaunchingWithOptions:)Move long-running tasks off the main thread: When the user launches your app, make a good impression by launching quickly. UIKit doesn’t present your app’s interface until after the
application(_:didFinishLaunchingWithOptions:)method returns. Performing long-running tasks in that method or yourapplication(_:willFinishLaunchingWithOptions:)method might make your app appear sluggish to the user.Determine why your app launched : When UIKit launches your app, it passes along a launch options dictionary to your
application(_:willFinishLaunchingWithOptions:)andapplication(_:didFinishLaunchingWithOptions:)methods with information about why your app launched. The keys in that dictionary indicate important tasks to perform immediately. For example, they might reflect actions that the user started elsewhere and wants to continue in your app.
Note
For a scene-based app, examine the options that UIKit passes to the
application(_:configurationForConnecting:options:)method to determine why it created your scene.
1 | //The following code shows the app delegate method for an app that handles background location updates. When the location key is present, the app starts location updates immediately instead of deferring them until later. Starting location updates allows the Core Location framework to deliver the new location event. |
[Launch time]: About the app launch sequence
Learn the order in which the system executes your code at app launch time.
The following illustrates the individual steps of this launch sequence, from the time the app launches to when the sequence completes:
If your app executes code before the call to UIApplicationMain(_:_:_:_:), such as in static initializers like load(), don’t make assumptions about what services and resources are available. For example, keychain items may be unavailable because their data protection policies require an unlocked device and prewarming happens even when the device is in a locked state. If your code is dependent upon access to a specific service or resource, migrate that code to a later part of the launch sequence.
Prewarming an app results in an indeterminate amount of time between when the prewarming phase completes and when the user, or system, fully launches the app. Because of this, use MetricKit to accurately measure user-driven launch and resume times instead of manually signposting various points of the launch sequence.
[Launch time]: Performing one-time setup for your app
Ensure proper configuration of your app environment.
Perform any one-time tasks in your app delegate’s application(_:willFinishLaunchingWithOptions:) or application(_:didFinishLaunchingWithOptions:) method. Never block the app’s main thread for tasks that don’t require user input. Instead, start tasks asynchronously using a dispatch queue, and let them run in the background while your app finishes launching. For tasks that require user input, make all changes to your user interface in the application(_:didFinishLaunchingWithOptions:) method.
Your app has its own container directory for storing files, and you should always place app-specific files in the ~/Library subdirectory. Specifically, store your files in the following ~/Library subdirectories:
~/Library/Application Support/— Store app-specific files that you want backed up with the user’s other content. (You can create custom subdirectories here as needed.) Use this directory for data files, configuration files, document templates, and so on.~/Library/Caches/— Store temporary data files that can be easily regenerated or downloaded.
To obtain a URL for one of the directories in your app’s container, use the urls(for:in:) method of FileManager.
1 | let appSupportURL = FileManager.default.urls(for: |
Place any temporary files in your app’s tmp/ directory. Temporary files might include compressed files that you intend to delete once their contents have been extracted and installed elsewhere. Retrieve the URL for your app’s temporary directory using the temporaryDirectory method of FileManager.
[Launch time]: Preserving your app’s UI across launches
Return your app to its previous state after the system terminates it.
At appropriate times, UIKit preserves the state of your app’s views and view controllers to an encrypted file on disk. When your app is terminated and relaunched later, UIKit reconstructs your views and view controllers from the preserved data. The preservation and restoration processes are initiated automatically, but you must also do some specific work to support those processes:
Enable support for state preservation and restoration. You opt-in to state preservation and restoration by implementing your app delegate’s
application(_:shouldSaveSecureApplicationState:)andapplication(_:shouldRestoreSecureApplicationState:)methods. Both methods return a Boolean value indicating whether the associated process should occur, and in most cases you simply returntrue. However, you can returnfalseat times when restoring your app’s interface might not be appropriate. If you prevent restoration from occurring, you can still configure your app’s interface manually in theapplication(_:didFinishLaunchingWithOptions:)method of your app delegate.Assign restoration identifiers to the view controllers that you want to preserve. A restoration identifier is a unique string that you assign to the view controller programmatically or in Interface Builder. Add that string to the view controller in your storyboard file or assign it to the view controller’s
restorationIdentifierproperty at runtime.Recreate view controllers, as needed, at restoration time. UIKit loads both the view controller and its views from your storyboard initially. After those objects have been loaded and initialized, UIKit begins restoring their state information. Use your
decodeRestorableState(with:)methods to return your view controller to its previous state.Encode and decode the custom data that you need to restore your view controller to its previous state. During the preservation process, UIKit calls the
encodeRestorableState(with:)method of each preserved view and view controller. Use this method to preserve the information that you need to return the view or view controller to its current state.